

JHP Newsletter - 2012, No. 3, 7 September
Greetings from the Conata Basin in southwestern South Dakota, the area around Badlands National Park and Buffalo Gap National Grassland. It's been a busy, and very productive, two months since the last Newsletter.
Equipment: Canon EOS 1D X
I had been on a wait list to get a Canon EOS 1D X since last October and finally received one a couple of weeks ago. My initial impressions weren't that favorable, but after using it in the field for just two days, I started to love it.
Ergonomics and Controls
These are the items that created the unfavorable first impression. The grip has been redesigned so it's really squared off on the lens side. It's uncomfortable to me when holding the body with all four fingers on the grip like when operating the rear controls to set up the camera. However, it is quite comfortable when shooting with a long lens supported by a tripod or beanbag. The rubber cover for the system extension terminal is held in place by a protruding hinge that digs into the fleshy part of my thumb when handholding the body in a vertical orientation with a short lens attached. When I get an L-bracket for the body, that will likely keep that torture device away from my hand. The whole viewfinder has a pink glow in low light conditions when selecting auto-focus points.
A lot of the buttons can be customized by the user. It's almost like the designers said, "We can't figure out the best way to make this work, maybe the users can." Unfortunately, not every button can be set to control any function. For example, I'd like to use the AE lock button to turn on and off the rear LCD level, but that's not an option. However, it is possible to turn off the AE lock button, so I'll never have to deal with a "locked camera" if I inadvertently hit it like I've done in the past.
The Quick Control Button (Q button) is an odd addition. On my previous 1-series bodies, I've been using the Info button to display the information from the top LCD panel on the rear LCD screen, and the Q button does almost the same. However, the Q button doesn't show the battery level, whether mirror lockup is on, or the number of frames that remain. So for now, I'm still using the Info button. I've also programmed the Info button to show the level on the rear LCD screen. The level is really cool to have because I'll no longer have to mess with a triple-axis hot-shoe mounted level. When I was shooting grand landscapes with wildflowers recently, I would mount the level, compose the shot, then switch to my Shoot RC-300 RS-80N3 Wireless Remote (the receiver mounts to the hot shoe). Now I'll be able to use the built-in level and the Shoot Wireless Remote at the same time.
The one new button I really like is the dedicated Live View button. Previously, I had the Set button on the 1Ds Mk III programmed to turn on and off Live View, but had it programmed to change ISO on the 1D Mk IV. With the 1D X, I have the Set button programmed to change ISO and I can turn on and off Live View via the dedicated button.
I've programmed the Multi-function button 2, next to the depth-of-field-preview buttons, to display the viewfinder level. Sometimes when photographing wildlife, especially from a vehicle where I sometimes have to get into contortions to see through the viewfinder, I have trouble getting the camera level. Now, I can quickly check the level while shooting without taking my eye off the subject.
The blue "+" and "–" buttons for zooming in Live View or image review are gone. In Live View, pushing the magnifying glass button cycles between the magnifications, and in image review, the front main dial is used to zoom in and out. It'll take a while for this new mode of operation to become second nature, but I think it's a better way to work the zoom controls.
Auto-Focus
The new 61-point automatic selection AF mode, where all 61 AF points are available for automatic selection, is fantastic. As part of the face-recognition system, you can select any one of the 61 AF points to train the system for a particular subject. Then the camera will continue to do its best to focus on that "face." What really makes this system useful is that the active focus points are shown in the viewfinder, even in AI-servo mode. In previous bodies, feedback was only given in One Shot mode. This focusing system is a game changer! Have you ever been frustrated while photographing a subject that keeps changing where its head is within the frame? I know I have, and after trying to move a single AF point to keep up with the moving eye, I would usually switch to all points, aka the "ring of fire," and hope that the AF system would focus on the correct part of the subject or that the depth-of-field would be enough to get the eye in focus. With the new 61-point AF system and face recognition, it's possible to see where the camera's actually focusing so you know it's time to retrain it if it keeps focusing on some other part of the subject.
High-ISO Noise
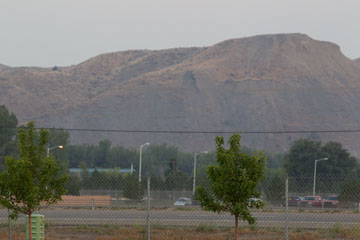
The first thing I did after setting up the 1D X was evaluate high-ISO noise compared to the 1D Mk IV. High-ISO is relative, and I don't like noise. Lately with the 1D Mk IV, I've been going to ISO 640 if I had to and ISO 800 if I really had to.Along the way, I discovered something odd with the way Capture One (v6.4.3) handles the RAW files from the 1D X. When processing the images with the default settings, it's almost like the 1D Mk IV image was shot with Kodachrome (below left) and the 1D X image was shot with Velvia (below right). To be fair, Capture One (v6.4.3) only has "preliminary support" for the 1D X, but I'm still very surprised by the results.
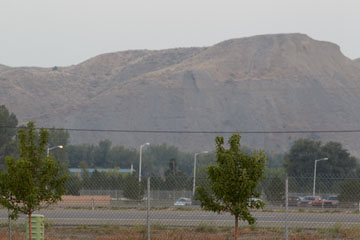
1/10 sec, f8, ISO 200, Capture One v6.4.3
1/10 sec, f8, ISO 200, Capture One v6.4.3
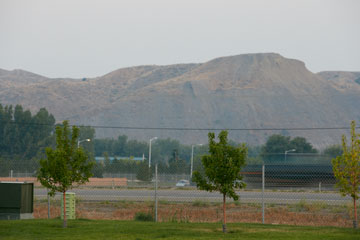
Adobe Camera Raw (ACR, v7.1.0.354) produces similar images for both bodies (below), yet different than both Capture One images.
1/10 sec, f8, ISO 200, ACR v7.1.0.354
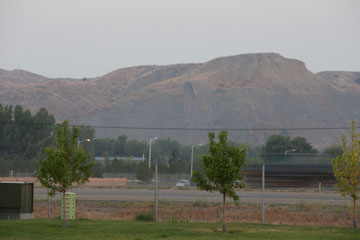
1/10 sec, f8, ISO 200, ACR v7.1.0.354
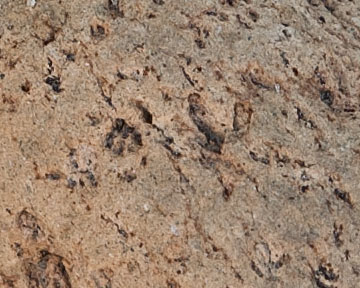
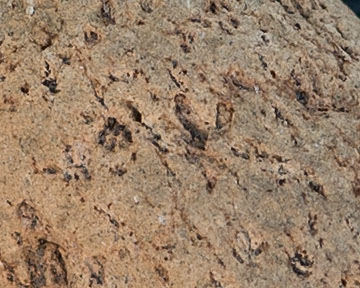
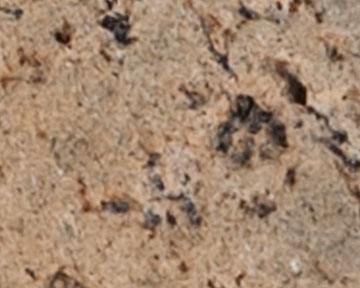
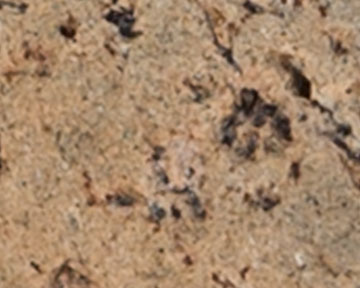
The following images show a 100% crop from images processed by Capture One near the center and show the tree in the foreground with detail, trees in the middle ground with hardly any detail, and a distant background. Based on my initial tests, the 1D X has about a 1.5-stop increase in usable ISO. In other words, the noise at ISO 1600 with the 1D X is about the same as the noise at ISO 500 or 640 with the 1D Mk IV which is great news.
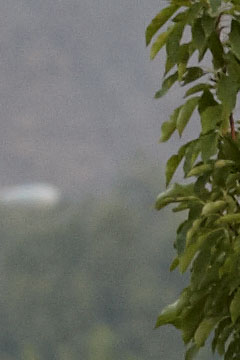
70-200 2.8 IS II (at 200mm),
1/20 sec, f8, ISO 400, Capture One v6.4.3

70-200 2.8 IS II (at 200mm),
1/45 sec, f8, ISO 800, Capture One v6.4.3
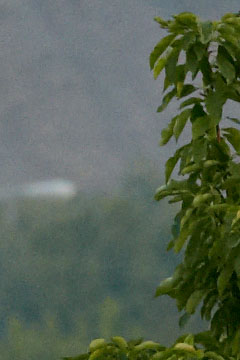
70-200 2.8 IS II (at 200mm),
1/90 sec, f8, ISO 1600, Capture One v6.4.3
Resolution
The next thing I did was compare the resolution of the 18.1MP 1D X with the 21.1MP 1Ds Mk III. I processed the images through Adobe Camera Raw (ACR, v7.1.0.354) to get consistent color and adjusted the exposure so they'd match, and then ran them through Photoshop, including a Silver Efex Pro layer for luminosity, like I would do for any image, and I used the same settings for both images. The following two images show the whole composition, and as one would expect after shrinking the images to web size you can't tell them apart.
1/8 sec, f8, ISO 100, ACR v7.1.0.354
1/6 sec, f8, ISO 100, ACR v7.1.0.354
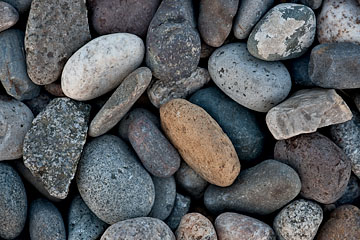
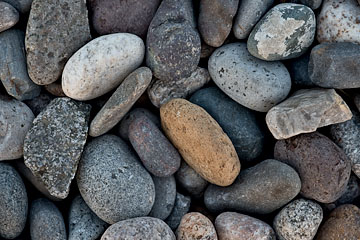
The following two images show a 100% crop from near the center of the image, and the detail from the 1D X looks rather good.
1/8 sec, f8, ISO 100, ACR v7.1.0.354
1/6 sec, f8, ISO 100, ACR v7.1.0.354
The next step was to up-res both images to be 20x30 inches at 360 ppi using the Bicubic Automatic mode in Photoshop. For reference, the 1Ds Mk III captures a 10.4x15.6 inch image at 360 ppi and the 1D X captures a 9.6x14.4 inch image at 360 ppi. After up-resing the images, the detail from the 1D X still looks rather good. The edges of significant features look crisper with the 1D X, but there's a slight loss of very fine detail. I don't think the differences would be noticeable in a print, especially at a normal viewing distance.
1/8 sec, f8, ISO 100, ACR v7.1.0.354
1/6 sec, f8, ISO 100, ACR v7.1.0.354
Conclusions
The Canon EOS 1D X is an incredible body for wildlife photography. It has about an additional 1.5 stops of usable ISO, and the new 61-point AF system with face recognition is a game changer. There are, however, two down sides compared to the 1D Mk IV. First is the loss of the 1.3x magnification factor which I've grown accustomed to, but I'm more than willing to give it up for the improved high-ISO image quality and the new 61-point AF system. Second, it cannot auto-focus when the maximum aperture is f8 whereas previous 1-series bodies could. In other words, auto-focus will not work on the 500 f4 or 600 f4 with a 2x extender nor the 800 f5.6 with a 1.4x extender.
Is the 1D X also an incredible body for landscape photography? Almost. It's 18.1MP won't provide quite the same level of detail as the 21.1MP of a 1Ds Mk III or 5D Mk II or the 22.3MP of a 5D Mk III, but I feel the 1D X is acceptable. One of the biggest improvements for landscape photography is the new auto-bracket flexibility. Previously, you were stuck with three (3) shots, and now you can select 2, 3, 5, or 7 shots. Plus, now the baseline exposure compensation can be adjusted to ±5 stops, whereas previous 1-series bodies were limited to ±3 stops. The built-in rear-LCD level is another nice improvement.
For a mix of wildlife and landscape photography, the 1D X is in fact the one body to rule them all. I'll be retiring my 1Ds Mk III after I obtain an L-bracket for the 1D X and it can take over full landscape shooting duties. The 1D X is already my primary wildlife body — I love it!
Technique: Long Lens Shooting
I've started to change the way I shoot with my 500 f4. I used to shoot almost everything at f8, with and without the 1.4x, in order to get some depth of field (DOF). After talking with photographers in Yellowstone back in May, I consulted an app (simpleDOF for iPhone) to see what the depth of field really was for a long lens and a subject 100 yds (91 m) away, the usual distance for bears there. For 700mm (500 & 1.4x), f8, and a subject 100 yds (91 m) away, the depth of field is about 19 ft (5.8 m). This is for a circle of confusion of 0.00085 in (0.022 mm), so your mileage may vary. That's a lot of depth of field. Even reducing the f-stop to f5.6, the depth of field is still 13.4 ft (4.1 m). By comparison, for 700mm, f8, and a subject 20 yds (18 m) away, the depth of field is only 0.74 ft (8.9 in or 23 cm). That's a whole lot smaller than for a subject far away, but it's still plenty of DOF for most single subjects. So armed with this knowledge, I've been shooting wide open, or just closed down half a stop, a lot more, especially when the subject is far away in order to get more shutter speed or to use a lower ISO.
Tour: Tanzania in February 2013
There are still spaces available for this 15-day photo tour to two of the best locations to photograph African plains wildlife. We will visit Ngorongoro Crater and Serengeti National Park during the height of the wildebeest birthing season for lots of predator-prey interaction. We should have good opportunities to photograph lion, cheetah, leopard, baboon, monkey, elephant, gazelle, giraffe hippo, and zebra.
Travel: Colorado Wildflowers
Back in early July, Jan and I went to the high country of Colorado to photograph the wildflowers. The wildflower bloom was unusual this year because of the light snowfall this past winter. Some areas didn't have very many flowers and most places were blooming about two or three weeks earlier than normal. The best flowers are located in the high country which is accessible via 4WD roads, and my newly-outfitted Jeep Liberty made it easy to get there (below left). The off-road capability of the stock Liberty is a bit marginal, so I had an OME (Old Man Emu) lift kit and larger tires installed (245/75R16 instead of the stock 225/75R16). The OME lift replaces all of the springs and struts (shocks) and raises the Jeep about 2 in (5 cm) and the larger tires raise it about another 0.6 in (1.5 cm). The stock suspension is really stiff, and the OME is a bit spongy for my taste on paved roads, however it really smooths out the ride on the trail.

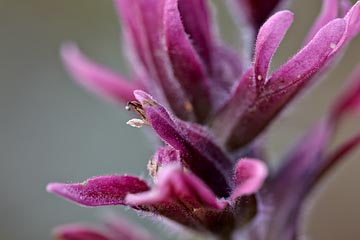
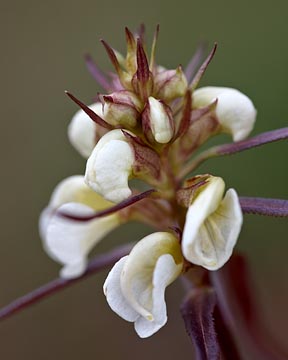
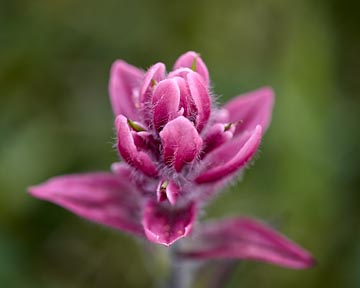
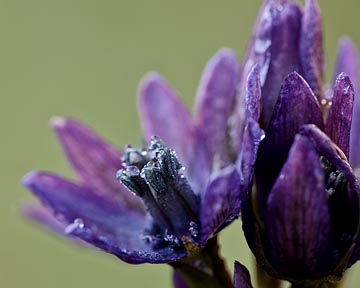
We started in the Gunnison National Forest around Crested Butte, and the flowers were thinner than usual. I was able to make some nice portrait images (above right and below left), but grand landscapes were out of the question.
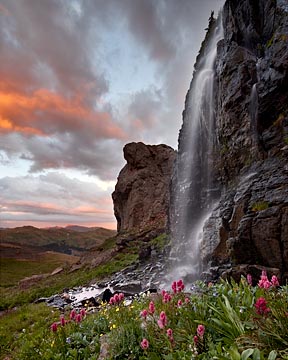
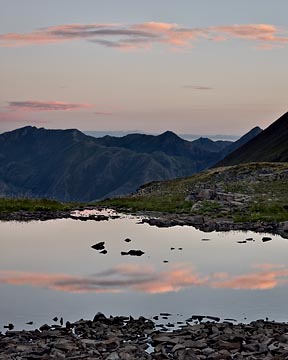
After only two nights near Crested Butte, I moved on to the area around Red Mountain Pass between Ouray and Silverton which is in the San Juan National Forest. The flowers were much better there and I stayed for twelve nights. Jan joined me for the last two. The area around the waterfall in the image above right is one of my favorite places to photograph wildflowers in Colorado, and conditions were good this year.
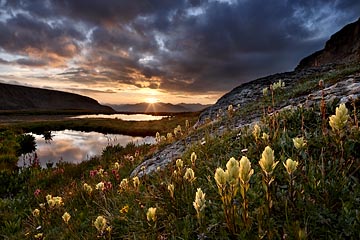
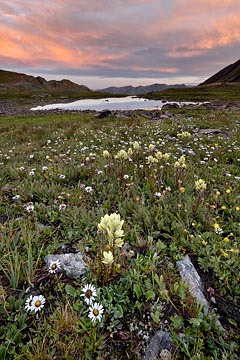
I kept returning to one area over and over again at sunrise because the compositions were nice and I just needed the clouds to cooperate. On one morning when the clouds weren't very cooperative, I tried something unusual for me and photographed the sun itself as it rose (below left) and I just love the star burst as the sun crested the horizon. Four mornings later, the clouds were very cooperative, but another photographer had set up such that I would have been in his image at sunrise to make an image similar to the previous one. So, I stayed set up where I had been photographing before sunrise. As soon as the sun crested the horizon, the paintbrush in the foreground started to glow (below right) and I was thrilled that someone had prevented me from making the image I had planned.
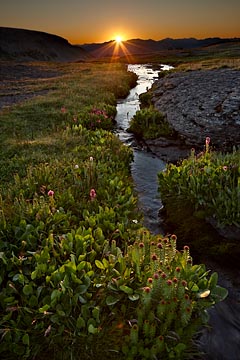
1/180, 1/20, 1/6, and 0.3 sec; f11; ISO 100
1/2000, 1/500, 1/60, 1/30, 1/15, 1/8 & 1/4 sec; f11; ISO 100
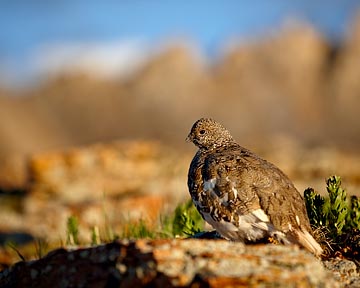
On another one of those mornings when the clouds didn't cooperate, I explored an area I hadn't been to before. I came across a male White-Tailed Ptarmigan and was a bit disappointed that the longest lens I had with me was a 180mm Macro, but I was able to work my way close to him to capture some nice images. I particularly like this one (below left) because the wider-than-usual angle-of-view provides a sense of its environment.
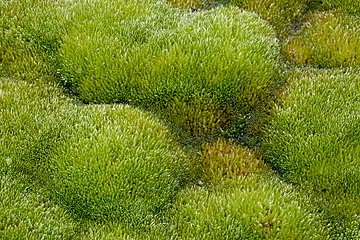
In mid July, Jan and I moved closer to Silverton for eleven nights in order to photograph other locations. One of my favorites was Stony Pass which I hadn't been to before this visit. There was an incredible bright-green patch of moss in the middle of the darker green vegetation, and I just had to photograph it. I enjoyed the patterns created by the small mounds in the moss (above right). There was a wonderful tarn at the top of Stoney Pass and I spent most sunrises there. Sometimes colorful clouds filled the sky and I could shoot wide (below left) and sometimes there was just a sliver and I used a telephoto (below right).
The area around Clear Lake, another of my favorite wildflower photograph spots, was good for portraits this year (below).
Travel: Glacier National Park, Montana
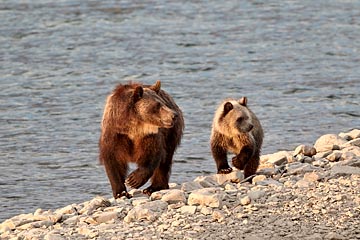
In mid August, I went to Glacier National Park. It's my favorite National Park in the lower 48, and I almost didn't go there because of not-so-good reports I had gotten of conditions there this year. However, I just had to go check it out for myself, and I'm so glad I did. While the wildflowers were slightly below average, the Saskatoon berries were ripening along the road in the Many Glacier area. That attracted lots of Grizzly Bears, and photography was great because the park has improved their bear management policy. I ended up staying twelve nights! I would have stayed longer but I had to leave to go pick up my new 1D X.
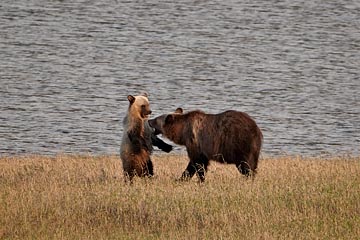
My favorite bears were a Grizzly sow and yearling cub. The cub had a really light-colored gray body with dark brown ears and legs that made it look like a panda bear! It was hard to get good images of them because they were usually feeding in dense brush. One morning, I photographed them as they walked along the shore of Lake Sherburne (below left) out in the open, and even in-step and looking the same direction. One evening, I photographed them as the played near the shore of Lake Sherburne in some short grass (below right).
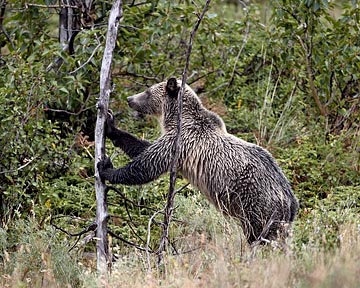
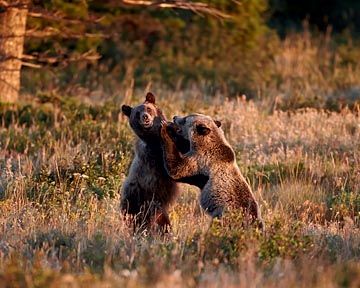
Other favorite subjects were two sub-adult Grizzlies that were hanging out together. The lighter colored bear didn't want to eat just the berries and was frequently looking for something else. In the image below left, she's trying to push down a small dead tree. She didn't get it pushing that direction, but but got it when pushing it directly towards me and was rewarded with some yummy grubs. A few days later, the two were out in the open right after sunrise, and I was thrilled when they started to play in the golden light (below right).
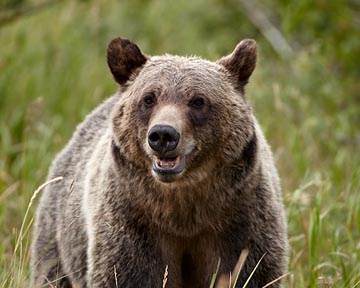
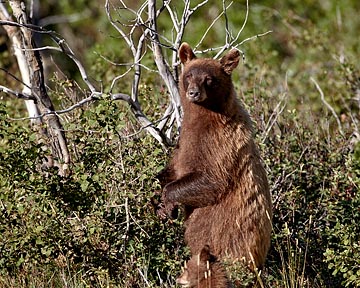
There was also a lone Grizzly hanging around, probably a boar, that gave me some great photo ops one afternoon (below left). And there was a cinnamon Black Bear sow with two cubs-of-the-year too. They weren't very cooperative, and I was only able to get good images of the sow (below right).
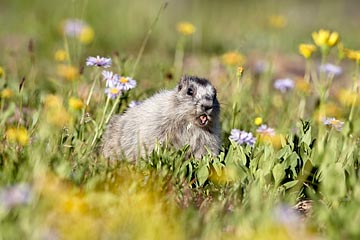
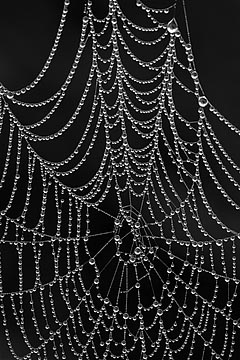
While I spent most of my time photographing the bears, I took some time to photograph other subjects. One of my favorite places in the park is the area around Logan Pass, and one afternoon I hiked up to the Hidden Lake overlook. I photographed some Mountain Goats, Columbian Ground Squirrels, and Hoary Marmots (below left) in the wildflowers. One foggy morning I was driving slowly along the road trying to locate a bear that had just stepped off the road, and I spotted several dew-covered spider webs. After I couldn't locate the bear, I turned my attention to the spider webs (below right).
Travel: Custer State Park and Wind Cave National Park, South Dakota
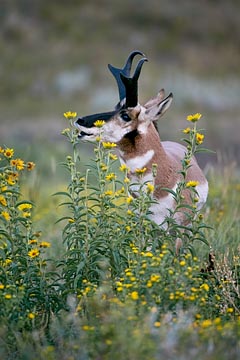
At the end of August and the beginning of September, I spent seven nights at Custer State Park in South Dakota. I started using my 1D X in the field, and quickly grew to love it. Custer State Park and neighboring Wind Cave National Park are great places to photograph Pronghorn because they're protected from hunting and lots of people drive by in vehicles to watch and photograph them. The Pronghorns were beginning their rut, and one evening in Wind Cave I photographed a buck that was protecting his harem from a rival buck. In the image below left, the buck with the harem is running to chase away his rival. When he started to run, I quickly reduced the ISO and increased the f-stop to get a slow shutter speed. By panning as the buck ran by, I was able create motion blur of the background while keeping his eye sharp. In the image below right, a different buck is scent marking.

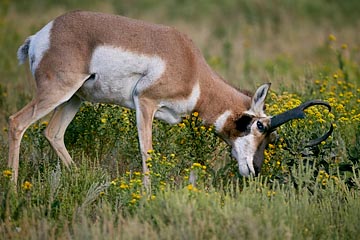
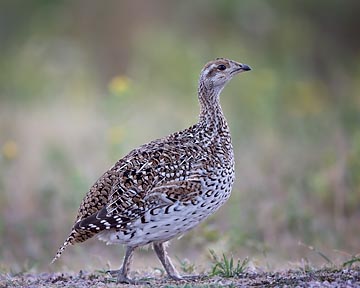
It was extremely dry there and the rolling hills were mostly covered with dry brown grass, so I was always excited to find subjects surrounded by the patches of yellow wildflowers. I was absolutely thrilled when a Pronghorn buck I was photographing started to eat some of the blossoms (below left). Sharp-Tailed Grouse were very common this time, and I had several good opportunities to photograph them (below right). I made that image at end of the day, after the sun had officially set. It was pretty dark, but the environment was nice and with the good high-ISO performance of the 1D X I thought I'd try to photograph it. Is it a potential BBC-winning image? No. Am I happy with the image? Heck yeah! This is an image I wouldn't have even tried to capture using my old bodies.
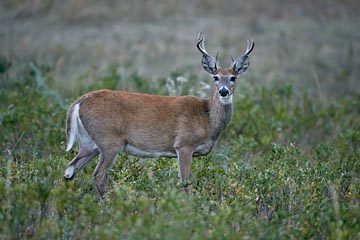
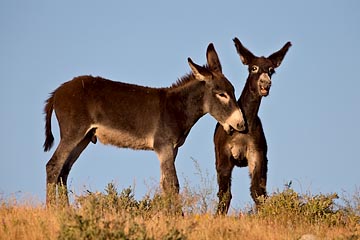
Deer, both White-Tailed and Mule, are also common but they're not usually very cooperative. This buck (below left) paused ever so briefly one morning for me to capture him before he moved on. There's a very friendly herd of wild Burros in the park that likes to hang out on the road to get loving attention (read food) from the tourists. They can get a bit pushy and will put their heads inside your vehicle to make sure that you really don't have anything to give them. I had a blast photographing two young Burros as they played one morning. I can almost hear Eddie Murphy, as the voice of Donkey in the Shrek movies saying, "What do you think you're doing biting my chest like that?!"
Take care and happy shooting.
— James
James Hager Photography :: www.jameshagerphoto.com

